
Building the Sanding Center Pt. 1
02 23 2011
 With fall here and time opened back up for shop projects, the building of the sanding center can commence! In order to keep this as easy and economical as possible, I am using common stock available at any lumber yard or home center. Building the cabinet that will be the body of the sanding center is the first step. I created the sides and back panels as frames with the pegboard sandwiched in the frame. I used "two by" stock (not pressure treated) planed to 1 1/4" thick and ripped into 2" wide strips. The pegboard was bought as 2 x 4 foot panels, so that set the sizes for the box parts.
You will need: 6 Stiles at 2" x 1-1/4" x 27" ; 4 Rails at 2" x 1-1/4" x 17" ; 2 Rails at 2" x 1-1/4" x 29" ; 2 pegboard panels at 17" x 24" and one pegboard panel at 29" x 24"
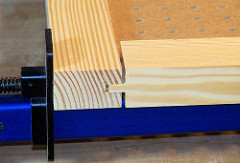
The rails and stiles get a 1/4" wide by 1/2" deep groove centered along one of the 1-1/4" edges to accept the panels and for the tongue and groove joints. Set your rip fence for 1/2" from the blade and make two passes flipping the stick in between passes to get a 1/4", perfectly centered groove. Now the ends of the rails need to get the tongues cut in them. The tongues need to be 1/4" wide by 1/2" long. I just set up the dado blade on my table saw, set the stop on my miter gauge to 1/2" less than the rail length, and trimmed them flipping to center the tongue. Start with the blade set a bit low and adjust until the tongue fits snug in the groove for a good fit right off the saw. This is a stub tenon joint and is used on shaker and mission style cabinet doors. Once the parts have been cut and dry fit to insure that everything is right, the frames can be glued up.
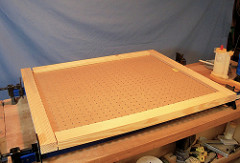
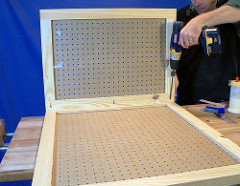
Assembling the panels is kept simple by butt jointing them together with the smaller side panels inside the back panel. I used pocket screws to keep it looking nice, but you can just screw through the back panel stiles into the sides. this assembly is a bit flimsy right now, but we will be adding a top and bottom plywood deck to lock it all together.
The doors will be built in a similar fashion in a future blog post, but as you can see even now, there is plenty of pegboard space available for hanging your sanding storage units that we designed and built previously. The lower deck will be attached to a 2x4 frame with wheels and the upper deck will hold the torsion box downdraft sanding surface.
I certainly invite you to add your thoughts or send along ideas that have worked well for you. Please feel free to add your comments here on the blog, on our Facebook page, or via Twitter. Let us know what you think! -2Sand.com